How to Use Heat Transfer Vinyl with Cricut: Full Guide
How’re you doing, crafters? I am passionate about DIY crafts, and I love making stuff for myself and my husband. Well, he is not into crafting, but whenever I create something for him, he gets super excited. Recently, I designed a shirt for him, and now he wears it everywhere. You can do the same with your Cricut machine. In this blog, I will tell you my way of using HTV. Be with me till the end to learn how to use heat transfer vinyl with Cricut.
I’ll show the exact steps that I
use while making interesting DIY projects. I am confident you will understand
through my words and all the photos that I am going to share with you here. Get
ready with your Cricut machine – you can simply use any of your machines that
can do the process cutting. I am using a Cricut Maker, which I really like and
use in all my crafts. Here, we are going to create something interesting.
What Tools and Supplies Will You Need to
Get Started?
As you know, you will need some
materials and tools to get started with your project; I am giving you a list of
a few of them to understand what exactly you need to arrange to make a fun
project.
●
HTV
●
Apparel (I am using
a blank T-shirt, you can use tote bags, onesies, etc.)
●
Cricut machine (I am
using a Cricut Maker)
●
Cricut Easy Press 2
(You can use a household iron, too)
●
Weeding tool
●
Standard Grip mat
●
Easy Press mat
With all these tools and
materials, you can create a beautiful project. I will explain the whole process
in a step-by-step guide.
How to Use Heat Transfer Vinyl with Cricut
Machine?
If you are wondering how I use Cricut heat transfer vinyl for
Cricut, here comes the final part of the blog, where you will learn how you
can use HTV to create a unique project. Look at the steps and learn my way of
using HTV.
Step 1: Use Cricut Design Space
As the first step includes
creating a design, you will have to use Cricut Design Space to make a unique
shirt design. I am using a cute design which is in an SVG file format. You can
choose the design for your craft.
To keep my design simple, I will
go for a monochrome design. If you want, you can use multiple colors too. To
use your own designs, you can simply upload them to the Cricut software.
Step 2: Modify Your Design for Cutting
When you upload your design or
the SVG file on the Design Space canvas, there are a few things you need to
modify, such as the colors, layers, and size, to make the design ready for
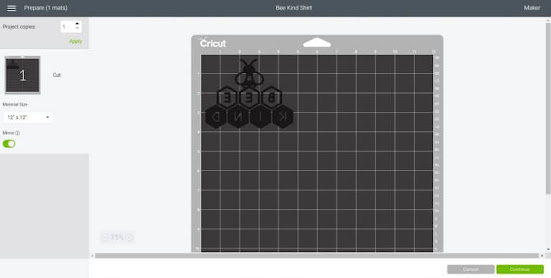
cutting. If you want to check that the image is ready to be cut, click the Make It button in green. It will show
you the preview screen.
The Cricut app can automatically
adjust your graphics and the text size on the mat to take out the best cutting
of the material. Once you are ready with the design, you can allow the machine
to cut, and if not, you should hit the Cancel
button to move back and modify your design a little more before taking the
final design.
To keep your text in one place,
you need to attach your shapes in Design Space. In order to change the color of
the Layer, you need to select the image or select Layer on the Layers Panel and
click on the Square below the Linotype menu on the top to choose a
new color.
Step 3: Load the Material and Blades in
Cricut
If you want to learn how to use heat transfer vinyl with Cricut,
you need to follow all the steps carefully. Before ordering your machine to cut
the design, you need to ensure that you mirror your design on the left side of
your mat. While cutting the heat transfer vinyl, you will always need to mirror
your designs. Once you are all set, hit the Continue button in green.
I prefer using Cricut
iron-on vinyl for my projects; you can use any other brand, too. When the
machine asks you to select the material, you should select the right one. After
that, you will have to load all the blades and your cutting mat into your
Cricut machine.
Before placing your mat into the
machine, you need to place the HTV on the Standard Grip mat and slightly press
down your vinyl to ensure that it sticks well to the mat without wrinkles.
Now, you need to load the fine
point blades in Clamp B, and you won’t need any tool in Clamp A while cutting
the HTV. After that, you can load your mat into the Cricut machine, align it on
the guides, and hit the Load button.
When done, hit the Go button on the Cricut machine to
start cutting the HTV material. Now, you are ready to finish up your project
and learn how to use heat transfer vinyl
with Cricut.
Step 4: Unload the Cricut Cutting Mat
When your cut is finished, hit
the Load/Unload button to take your
mat off the machine. You can flip your mat and then peel away the HTV while
holding the vinyl against the surface to avoid curling the vinyl. Next, weed
off the excess of HTV from the design to remove the baby pieces from the
design.
Step 5: Preheat Your Shirt
When your design is ready, you
will need to preheat your apparel to make a wrinkle-free and lint-free project.
A preheat prepares your apparel for the final heating. In the case of regular
iron, just move the iron for 15 seconds.
If you are using Easy Press, you
can consider the Cricut Heat app to
get the right heat pressure and pressure settings for your project. So, I
preheat my T-shirt with my Easy Press for about five seconds, and then I apply
the HTV design onto the shirt apparel.
Also, the transfer sheet backing
of the HTV is usually sticky and can hold your design while you are pressing
it. However, if you want to make your design more stable while heating, you can
apply heat-resistant tape before pressing it.
Step 6: Apply Heat to Your Shirt
When your design is finished,
you can apply the Easy Press onto your blank apparel with light pressure for
just 30 seconds. Then, let it stand for a few seconds until it cools down. When
the shirt is cooled down, just slowly peel off the transfer sheet from the HTV.
Now, you have your final design
on the shirt. It’s an awesome experience for everybody who wants to make
something unique with their Cricut machine. Here is my guide on how to use heat transfer vinyl with Cricut
ends, and I am pretty sure that you will try making anything simple and amazing
with HTV and Cricut machines.
Source URL: - How to Use Heat Transfer Vinyl with Cricut
Visit - Cricut iron-on vinyl


Comments
Post a Comment